This WordPress blog is not public.

cardboard light box blog post

Here's a tutorial on how to make a DIY photography cardboard light box for next to nothing. You'll find most of the materials needed around the house and in about 1 hour you'll have your very own mini studio which is great for taking macro photos. This tutorial has become so popular over the last few months and I hope that you'll also take up the challenge and make one of these for yourself as it is so easy to make and the results are just fantastic! Just start with a cardboard box and some tracing paper!

A few years ago I'd been given the privilege of having my very own mid-week scavenger hunt on Ramblings and Photos and I was invited to write a guest post on making a DIY light box.  I never wanted google to see duplicate content so the post wasn't published on my own blog.  Now that the guest post doesn't exist (there's just the screenshot I took back then) I've now published it here on my blog.


Cardboard Lightbox for Photography

As winter approaches most of us will be spending more time photographing indoors rather than outdoors. So I'm going to show you how to make a table top digital photography studio otherwise known as a lightbox. It's very easy to make and only costs a few dollars/pounds to make.

What you Need

  • A cardboard box -  my box dimensions were height 15 inches x width 14.5 inches x depth 15 inches.  Don't have the box too big as you'll have to store it when its not in use.  It's also easier to work with a smaller box than one that is too big as the kids will just want to play with it too.
  • Sellotape
  • 3 sheets of tracing paper -  Mine were each A4 size - 12 inches x 8 inches
  • At least 1 metre length of white strong cardboard (shirt board) that bends and is wide enough to fit inside your box.  Any art/craft shop will sell this.
  • Scissors
  • Ruler
  • Marker pen
  • A strong light source/lights

Once you've sourced all your materials the lightbox won't take long to make. Furthermore it really will improve your soocs and save you time post editing.

high key vintage fishing tackle in lightbox

Procedure For Making the Cardboard Light box

how to make a cardboard light box


inside the cardboard lightbox


#1 Place your box on its side with the 4 flaps facing you. Cut the top and the bottom flap off leaving you with a flap on the left and right hand side of the box. This helps direct light into the box as well as being useful pair of handles for carrying the box.
 
#2 Next you need a ruler to draw a rectangle on 3 sides of the box slightly smaller than the size of your tracing paper (you need something for the tracing paper to stick on to). One rectangle on the top and one on the left and one on the right hand side of the box. My rectangle windows each measure 11 inches  x 7.5 inches.  
 
#3 Then cut out around the marked edges of the rectangles.
 
#4 You now need to sellotape the tracing paper over each of those cut-out windows on the outside of the box. The tracing paper acts like a diffuser just like outside on a cloudy day.
 

Inside the Lightbox

 
#5 Measure the width inside your box and cut your much firmer shirtboard to that width. Mine is 14.5 inches wide and *1 metre long.
 
#6 Now place that whiteboard in the box up against the top of the back wall so that it gently bends at the base and reaches *beyond the flaps of the box. You now have a seamless white background to place your still life objects on to photograph. 
 
#7 Place a strong light on either side of the box facing the tracing paper so that the light pours into the box.

Tips when using your Cardboard light box

  • I didn't use a table for the shots shown here.  A chair, a floor lamp and a couple of cushions were very useful!
  • If I'm directing light into the box from the sides I place an old small table lamp with no shade at each side. Then I adjust the light by moving them closer or further away from the box.
  • The secret to getting good sooc's with this lightbox is setting your white balance correctly. I  found that having my degrees of Kelvin around 2500 - 2800 was good for the colour of light that I was using.  My white isn't gleaming white but pretty good I think for being sooc. I'm still learning how to work with degrees of kelvin indoors while in jpeg mode.
  • Another thing I did with the shot above was just to slightly overexpose it without blowing out too many highlights. My own in-camera light metering/exposure compensation just wasn't as accurate in these conditions. In fact it took a few experimental shots to get it nailed.

light source for cardboard lightbox

Adjusting light

high key fishing tackle

Sometimes I use a tripod other times I prefer to shoot handheld at different angles into the box. I've also found that the closer you get to the subject the brighter the white background sooc.


If you are not happy with the shadows inside the lightbox you can adjust the external lighting. Move the light closer to the tracing paper. Or make the light stronger by having the light source from both the top and the sides.

Editing in Photoshop 

To make the background whiter you can open the shot in Adobe Camera Raw. Then adjust the white balance with the eye dropper.  Another way is to choose the selective colour adjustment tool layer in photoshop. Select "white". Then slide the black slider to the left to make the white brighten just a little bit more.

 black dropper tool in photoshop

Or if you want to make a high key image you can go into your level adjustments layer. Choose the white eye dropper. Then place it on the white of the background to whiten the white a little more.

white dropper tool in photoshop

comparison between photos

Finally here's a comparison of the sooc with both the selective colour adjustment and levels adjustment made in photoshop.


You can compare the whiteness of each background.

Here's another example ...


vintage fishing tackle

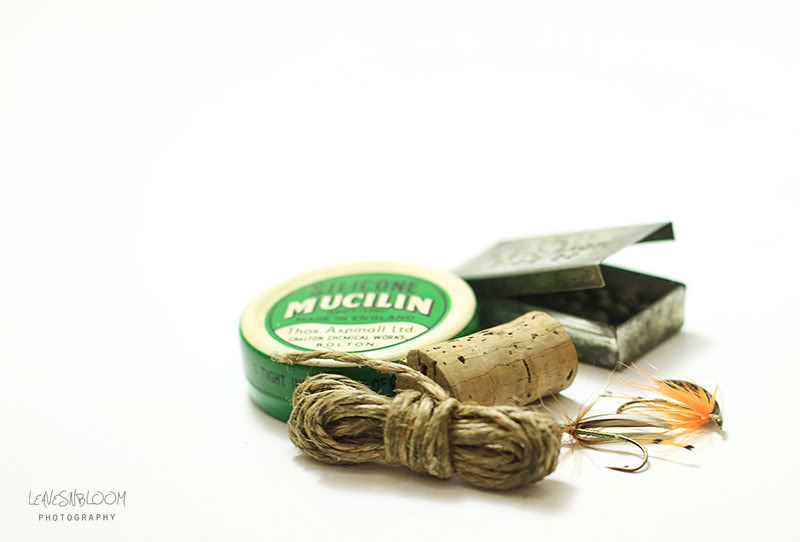
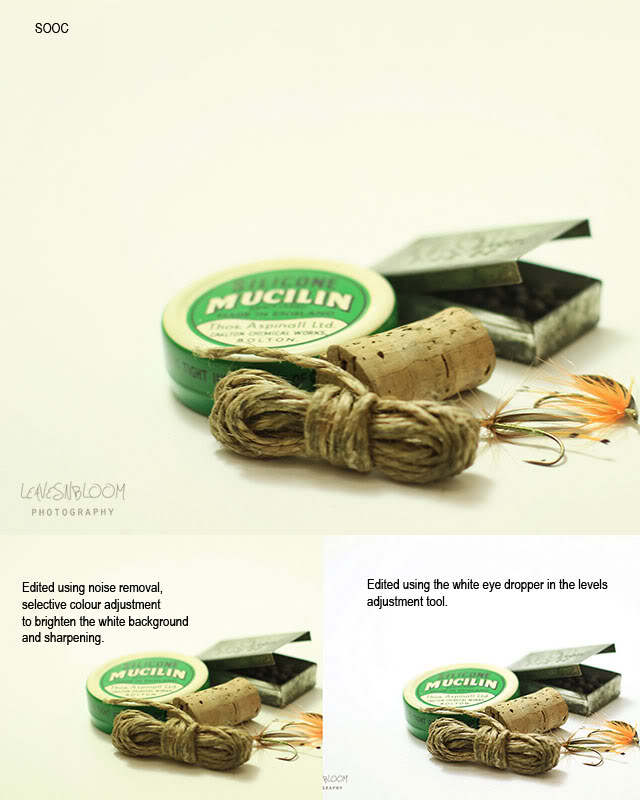
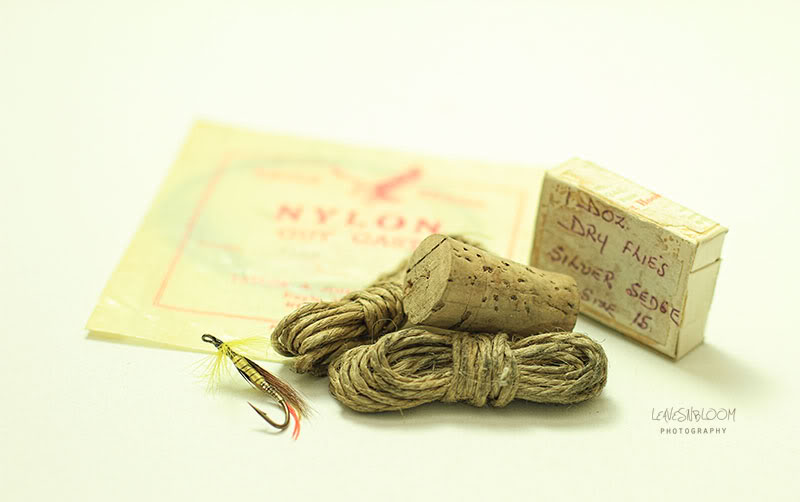
The photo is the real McKoi a genuine SOOC and it came out of the camera as white as that ... well if I didn't have a white blog background it would be quite close to looking white. I used 2900 degrees of kelvin white balance for my white balance setting. For my edit all this photograph needed was a contrast and clarity adjustment to bring out some of the detail, a slight crop and sharpening. Just make sure when you are croppping that you leave your shadows intact and don't crop into them.

high key cardboard lightbox image
after final adjustments - high key image

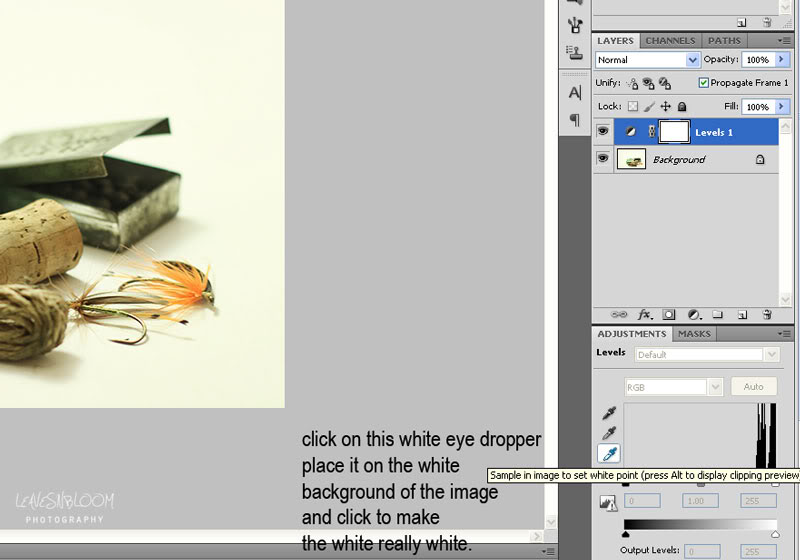
But there was just one more adjustment to make. I went back and touched up the background using the white eye dropper in the levels adjustment layer. After one click on that layer I can hardly see where the edge of the photo is as it blends in really well with my white background.  Talk about making your whites white! ...sorry that sound's too much like a washing powder ad doesn't it.  If the main subject in the photo looks too bright with that adjustment all you need to do is use a layer mask and use a soft brush at 100% opacity or less and brush the brightness off your subject.

What's Next?